
In a few previous postings we started exploring the I2C interface and in particular its use to access the most common and inexpensive type of Serial EEPROMs (24xxx). After the long preamble, it is about time to start talking about code. Today we will write a set of functions to read and write 16-bit integers to and from a Serial EEPROM device (a 24LC16 to be precise) similarly to what we have done in chapter 7 with the SPI interface to the 25lc256 device.
The I2C peripheral modules
The two I2C peripheral modules of the PIC24Fj128GA010 are controlled by the I2CxCON register that allows us to activate pretty much every function and capability of the module:
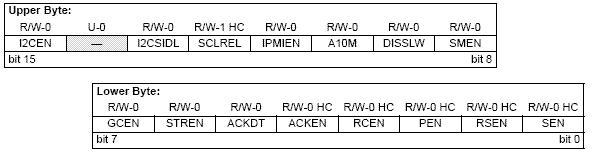
In practice you can consider it split in two parts: the top bits (bit15-bit 5) of the register define the configuration and mode of operation of the peripheral. The bottom five bits (bit4-bit0) are triggers that initiate I2C protocol sequences. For example, setting SEN initiates a START bit sequence. Setting PEN activates a STOP bit sequence and so on…
When a sequence terminates the corresponding bit in the control register is cleared.
There is also a status register, I2CxSTAT, available to report when errors have been encountered and to report a number of special conditions (mostly useful when operating in slave mode).
Each I2C module has a dedicated Baud Rate register, I2CxBRG, essentially a divider of the system clock, that allows us to control the speed of execution of each sequence relieving us from the need to time each operation manually. Even if in the following, for simplicity, we will wait for each sequence to complete, we could devise the whole program so to use interrupts and avoiding any delay.
The I2C.h library
The MPLAB C30 compiler offers a set of basic libraries that support the most common peripherals available on all devices of the PIC24 family. I have purposely avoided using most of them in the book to illustrate direct hardware control in C and, eventually, showing the readers how to create their own library modules instead. In the following though, I will make use of the I2C.h peripheral library as it provides just such a thin layer of abstraction to be useful without getting in the way and allowing us to learn to use the hardware peripheral quickly.
But in order to use any of the peripheral libraries with the MPLAB C30 compiler, in addition to the usual linker script file, we need to include a specific library file “libpPIC24Fxxx-coff.a” in the project list.
This is not an intuitive step and the right file is not exactly easy to find, unless you know where to look for it. If you installed MPLAB in the default directory, the path will be: c:\Program Files\Microchip\MPLAB C30\lib
Finally we get to create a new source file (we’ll call it “see24.c”) starting with the usual device include file and, now that we learned how to define the configuration bits in the source, we will add those too before including the I2C.h library file:
/*
** SEE24.c
** 24LCXX I2C serial EEPROM access demo
*/
#include <p24fj128ga010.h>
_CONFIG1( JTAGEN_OFF & GCP_OFF & GWRP_OFF & ICS_PGx2 & FWDTEN_OFF)
_CONFIG2( FNOSC_PRIPLL & FCKSM_CSDCMD & OSCIOFNC_OFF & POSCMOD_HS)
#define FCY    16000000L
#include <i2c.h>
Following a pattern similar to the one used in many other exercises before, we will define an initialization function initSEE() that will take care of configuring the I2C1 module to operate as a (single) master at the relatively low speed of 100kHz.
void initSEE( long fcy)
// fcy = processor operating frequency in Hz (system clock)
{  // Configure I2C for 7 bit address mode 100kHz

    OpenI2C1( I2C_ON & I2C_IDLE_CON & I2C_7BIT_ADD & I2C_STR_EN
                   & I2C_GCALL_DIS & I2C_SM_DIS & I2C_IPMI_DIS,
                   (fcy /(2*BUS_FRQ))-1);

    IdleI2C1();
    T1CON=0x8030;
    TMR1=0;
    while( TMR1< 100);
} //initSEE
As you can see all the heavy lifting is performed by two functions calls: OpenI2C1() essentially writes to I2C1CON the required (basic) configuration passed as the first parameter, and writes to the I2C1BRG the required clock divider value calculated for the given system clock frequency and the desired bus frequency, passed as a second parameter.
#define BUS_FRQ 100000L // 100kHz
The other function offered by the I2C.h libary, IdleI2C1(), is quite a handy one, and we will make heavy use of it in the following. It is like a catch all function that makes sure every sequence the I2C peripheral module is working on is completed. A short timed delay loop, using Timer1, completes the initialization sequence and has been added there only to make sure the serial EEPROM device has time to settle after a power up sequence before our PIC24 starts tormenting it.
The writeSEE() function
In the previous posting, we have seen the sequence required to issue a write command to a serial EEPROM. Today we will extend that sequence to store a 16-bit value (two bytes) using what is called a page write sequence. We can expressed it using our compact notation:
[S] [0b1010000](A) [Byte Address](A) [Data lsb](A) [Data msb](A) [P]
The first part of this sequence (highlighted) is responsible for selecting a specific memory location, the address, where the write operation will begin. It can be conveniently encapsulated in a function on his own as it will return to be useful later.
Here is how we can code it using two new functions: StartI2C1() and MasterWriteI2C1() whose respective role will be obvious:
int addressSEE( int add)
// send the address selection command
// repeat if SEE busy
{
    int cmd;

    // 1. Form SEE command + address msb (3)
    cmd= 0xA0|((add>>7)&0xE);

    // 2. WRITE(!) the Address msb
    // try send command and repeat until ACK is received
    while( 1)
    {
        StartI2C1();
        IdleI2C1();

        // send command and address msb(3)
        MasterWriteI2C1( cmd+WRITE_CMD);
        IdleI2C1();

        if (I2C1STATbits.ACKSTAT==0)
            break;

        StopI2C1();
        IdleI2C1();
    } // while waiting for ACK

    // 3. send address lsb
    MasterWriteI2C1( add);
    IdleI2C1();

    // 4. exit returning the cmd byte
    return cmd;
} // addressSEE
Notice how, after the command is formed, the second part of the function is actually expressed as a loop. In fact after a write command is sent to a serial EEPROM, the device might return a Nack indicating that it is busy and not available to take the command at the moment. Busy doing what? You will ask. Well, EEPROMs are notoriously slow devices when it comes to write operations (they can take as much as 5ms) so if write commands are issued in a rapid sequence, a busy message (in the form of a NACK) is to be expected.
The addressSEE() function is smart enough to perform a Stop sequence and repeat the whole Start and command part of the sequence until the serial EEPROM is ready to accept the command (Ack is received).
It is only at this point that the addresSEE() function sends a second byte containing the lsb of the address and returns.
The writeSEE() function can now use the addressSEE() function and then complete the sequence passing the two bytes of data (the 16-bit value) that will be written at the selected address and following location.
void writeSEE( int add, int v)
// SEE write command sequence
{
    int cmd;

    // 1. select address
    cmd = addressSEE( add);

    // 2. stream data out
    MasterWriteI2C1( v&0xFF);
    IdleI2C1();

    MasterWriteI2C1( v>>8);
    IdleI2C1();

    // 3. terminate the command sequence
    StopI2C1();
    IdleI2C1();

} //writeSEE
Notice that the serial EEPROM will begin the actual write operation only after the Stop sequence is completed by the master. Different Serial EEPROM models might accept a different number of bytes and require a specific address alignment to perform the page write. The 24LC16 type memory, we assume will be used in this example, can in fact accept as many as 16 bytes. It can store them in an internal buffer and write them simultaneously (in a single write cycle) upon receiving the Stop sequence.
The readSEE() function
If the simplest read sequence for a serial EEPROM is the current address read, expressed in the previous posting in the compact notation:
[S] [0b1010001](A) (Data)[N] [P]
Extending it to read sequentially two bytes (to obtain a 16-bit value) is simple enough if after reading the first byte we respond to the serial EEPROM with an Ack, inviting the device to continue streaming out the content of the next memory location:
[S] [0b1010001](A) (Data lsb)[A] (Data msb)[N] [P]
A more generic and useful read command, a random read, is obtained by combining the write command address selection with the current address read sequence:
[S] [0b1010000](A) [Byte Address](A) [P]
[S] [0b1010001](A) (Datalsb)[A] (Data msb)[N] [P]
Since we have already created the addressSEE() function providing the first part, completing the readSEE() function is a trivial exercise now:
int readSEE( int add)
// random access read command sequence
{
    int cmd, r;

    // 1. select address
    cmd = addressSEE( add);

    StopI2C1();
    IdleI2C1();

    // 2. read command
    StartI2C1(); IdleI2C1();
    MasterWriteI2C1( cmd+READ_CMD);
    IdleI2C1();

    // 3. stream data in (will continue until NACK is sent)
    r= MasterReadI2C1( );

    AckI2C1(); IdleI2C1();
    r|= (MasterReadI2C1()<<8);

    // 4. terminate read sequence (send NACK then STOP)
    NotAckI2C1(); IdleI2C1();
    StopI2C1(); IdleI2C1();

    return r;
} // readSEE
A simple for loop in the main() function of our project will test our ability to write (and read back) to every and each location of the 24LC16 device.
Since we have designed the routines so to virtualize the device as a 16-bit integer storage service, we will be able to store up to 1024 integers using all the capacity (16kbit) of the little 24LC16 Serial EEPROM. Notice that each integer address will need to be multiplied by two to obtain the byte address (unless we modify addressSEE() to perform the operation automatically for us)…
main (void )
{ // test the serial EEPROM

    initSEE( FCY);

    for( i=0; i<1024; i++)
    {
        writeSEE( i<<1, i);
        r = readSEE( i<<1);
        if (r!=i)
           break;
    }

    // main loop
    while( 1);

}
Let’s mount an 8-pin socket in the prototyping area of the Explorer16 board and you connect two pull up resistors to the 5V rail and respectively to the pins:
56 – SDA1 – RG3
57- SCL1 – RG2
of the PIC24fj128GA010 and the SDA(5) and SCL(6) pins of a 24LC16B serial EEPROM.
Also connect the WP(7) and Vcc pins to the 5V rail and the Vss(4) pin to GND.
Download the complete source code: SEE24.c SEE.h
After building the project and programming the PIC24 with your in circuit debugger of choice (ICD2, PIC Kit II, ReAL ICE…) you will be able to verify the correct operation of our little project: the loop will terminate with r == 1024 after all memory locations have been written to and verified.


