NESI – Ready for Blast Off

NESI

(Photo Credit: Texas A&M University)

I learned today about the NESI board (photo above), a PIC24 based data acquisition board designed to fit in the NanoRacks, a platform for research on microgravity effects on board of the International Space Station. It has been created by Texas A&M University, in collaboration with NASA, the Center for the Advancement of Science in Space (CASIS), NanoRacks, Texas Space Technology Applications and Research (T STAR) and several other organizations.

Students from a growing number of both private and public secondary schools around the United States [see the list] will be able to get the boards and prepare their experiments using a common software framework, ready for blast off!


Posted in PIC24 | Tagged , , | Comments Off on NESI – Ready for Blast Off

VGA Curiosity

Vga

The idea of driving a VGA display directly from the I/Os of a small 8-bit microcontroller might seem crazy at first, and perhaps because of this, it is certainly entertaining, and possibly useful to some of you.

It is actually easier than most would believe, especially with a modern PIC16F1 microcontroller thanks to a number of small but critical features:

  1. The oscillator circuit has a convenient 4x PLL that can can boost the internal oscillator frequency to 32MHz without requiring an external crystal.
  2. The EUSART module can operate in Synchronous mode up to 8MHz (and is dual buffered).
  3. The Enhanced Mid-Range core (PIC16F1) has dual indirect pointers with auto-increment/decrement
  4. MPLAB Code Configurator can help to create the project skeleton in minutes.

Granted the amount of RAM available is too small to do a proper graphical display (not to mention to make full use of color), it is though possible to achieve a text page (25×20), with a relatively small sacrifice while still leaving enough space for an actual application.

Continue reading

Posted in Graphics, PIC16, Tips and Tricks | Tagged , , , , | Comments Off on VGA Curiosity

A (not so) Virtual Machine for Oberon 0

PIC16F1716

The Oberon 0 compiler  I recently wrote (in Python) after following the online Compiler Construction course [1, 2] included much more than a single pass compiler. In the best tradition of such courses based on the work of N. Wirth, the lexer and parser are followed by a code generator that produces actual executables (binary) for a simplified RISC machine of sorts.  In this particular case, the RISC machine was based on an imaginary architecture, (almost exactly) in between a MIPS and an ARM 32-bit core. My Oberon 0 project [link] includes therefore also a disassember (see the Decode function in the osg.py module)  that helps verifying and debugging the (binary) code produced. Eventually a virtual machine (found in the risc.py module) does execute the code and therefore performes the ultimate test of correctness.

As part of the larger Oberon project, Wirth and his team actually did develop the core into silicon (using an FPGA) and demonstrated an entire system hardware/software/OS based on the Oberon design.

Virtual machines are very fashionable nowadays, but I sometimes wonder how many Java, Javascript or Python programmers do really understand what a virtual machine is, not to mention how many would be able to write one?

Besides, seeing the Oberon 0 VM running only inside my Mac was not sufficiently rewarding as an experience for me.

I needed to see LEDs blinking! So I decided to transform this virtual machine (written in Python on my Mac) into a virtual machine written in C and running on a PIC on my desk.

Since a PIC16F1716 had been sitting on a breadboard on my desk for the last couple of weeks (I honestly cannot remember why it got there in the first place), I did fire up MPLAB X and thanks to the MPLAB Code Configurator, in a couple of minutes I had a project scheleton up and running. An hour or so later the entire virtual machine was reproduced in all its detail. [link to GitHub repository]

I hope the irony of having an 8-bit microcontroller running a virtual machine designed truly around a 32-bit instruction set won’t escape you?!

Yet, there is nothing wrong with this exercise. A virtual machine is exactly what the name implies: an abstraction and as such it must transcend architectures, hardware implementation details, and performance factors. After all that is exactly the reason why we do create them!

The exercise is no different than my previous Z80 (Spectrum) virtual-ization on a PIC32 [project link] or  the Pymite VM running (Python byte-codes) on a PIC24/PIC32 [link].

For maximum convenience, I ended up connecting the PIC microcontroller to an MCP2221 breakout board (serial to USB bridge) and from there I had it download code and communicate back  to my Mac to test and debug extensively the design.

Sure enough, I got my blinking LED: “Hello (Embedded) World!


Posted in PIC16, Python, Tools | Tagged , , , , | Comments Off on A (not so) Virtual Machine for Oberon 0

Compiler Construction (part 2)

Python Logo

As promised, I am adding a few more thoughts on my recent (re-)exploration of  Compiler design and Python programming. I had been flirting before [link] with the idea of writing a compiler in Python, using tools developed in Python (for Python programmers) such  as the ‘RPython’ branch of ‘Pypy or starting form libraries such as ‘rply‘ . None of those tools though was taking the whole project (compiler) to its completion (or anywhere close enough for me). On the contrary, following the Compiler Construction class (on ITunesU) took me all the way to a functioning copy of an Oberon compiler.

Porting the code to Python was clearly an afterthought (mine) and the resulting code is far from being an exemplary piece of Pythonic work(!), but in the process I learned a lot AND got a working compiler for a (subset of) a real language: Oberon.

Ok, most of you might have never heard of Oberon or Modula II (or Pascal, really?) but for me there was extra motivation there, going down the memory lane!

Here is a short list of  observations I made in the translation (and refactoring) process:

Continue reading

Posted in Languages, Python, Tools | Tagged , , , | Comments Off on Compiler Construction (part 2)

High Endurance Flash made easy with MCC

The MPLAB Code Configurator is changing the way I write embedded applications. Some of my (relatively) recent code is starting to look positively ancient by comparison. Take for example AN1673, “Using the PIC16F1XXX High-Endurance Flash (HEF) Block”. It was written in the pre-MCC era (actually MCC was just on the drawing board when I published it) and you can tell.

But if you don’t know what a High endurance Flash block is, I’ll need to take a brief moment to introduce the concept/feature, first.
flight-record

Ok, the picture is about a (flight) endurance record set in 1949 in the city of Yuma (AZ) on an Aeronca Sedan, but I thought it was quite curious … (besides if you want to read more aviation stories follow this [link] to my favourite book collection)

High Endurance Flash blocks (HEF), featured on PIC16F1 microcontrollers, are novel hybrids between a data EEPROM and a Flash (program) memory block.

They get the benefits of both: the high erase/write cycle count (100K+) of an EEPROM but also the speed of the Flash block (up to 32 bytes written in 2.5ms max)!

Continue reading

Posted in PIC16, Tools | Tagged , , | Comments Off on High Endurance Flash made easy with MCC

An MCC Mystery Solved

MCC-logo

MPLAB Code Configurator is a tool that has revolutionised the way I work with microcontrollers. I use it every day, for each and every project and, in fact, I found out that I am creating more projects than ever because of MCC.

It is so easy to set up an experiment, a little proof of concept or simply to sketch out the skeleton of a new application that I don’t even think about it, I just do it.. in minutes!

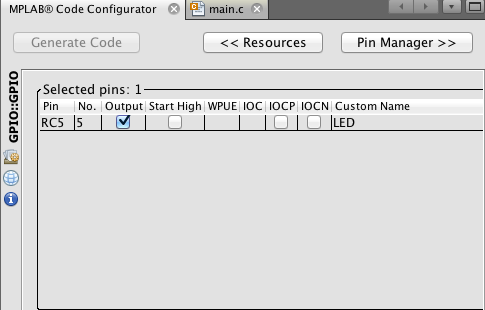
See the many examples I prepared for the Rocket Science book and for the Curiosity/Simplicity boards. Even the simplest activity such as defining the GP I/O pins is so much more convenient with MCC, besides, it never forgets to clear the ANSEL bits for me and it creates a pretty illustration that helps with the project documentation …

pinout

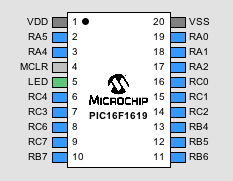
See the pin RC5? I gave it a custom name (LED) and made it an output with only a couple of clicks.

GPIOdialog

Once the “Generate Code” button is pressed a number of macros are created and placed in a file named:  “pin_manager.h”, intuitively enough. Here is a short excerpt:

// get/set LED aliases
#define LED_TRIS                TRISC5
#define LED_LAT                 LATC5
#define LED_PORT                RC5
#define LED_WPU                 WPUC5
#define LED_SetHigh()           do { LATC5 = 1; } while(0)
#define LED_SetLow()            do { LATC5 = 0; } while(0)
#define LED_Toggle()            do { LATC5 = ~LATC5; } while(0)
#define LED_GetValue()          RC5
#define LED_SetDigitalInput()   do { TRISC5 = 1; } while(0)
#define LED_SetDigitalOutput()  do { TRISC5 = 0; } while(0)
#define LED_SetPullup()         do { WPUC5 = 1; } while(0)
#define LED_ResetPullup()       do { WPUC5 = 0; } while(0)

Using these macros I can ensure that my code is going to be easier to read and in the future easier to port to other device or simply different I/O configurations. Being macros then, there is no waste of code space, the ones I don’t use, won’t generate any code.

Also note how some of the macros are more in the PIC “assembly style“, such as LED_TRIS and LED_PORT, while others are more in the “wiring style“, a bit more abstracted such as LED_SetHigh() and LED_SetLow(). I suppose it can be a matter of personal taste or past experiences…

But wait, what is going on with those do{…}while( 0) loops?

If you have not practiced your MISRA recently, it might seem that some MCC bug got into the pin manager and bloated our code unnecessarily. Nothing further from the truth, that is a really old trick designed to make those macros really safe to use in all  (C language) possible scenarios.

There are plenty of good articles on the web [for example] that explain in detail the  (not so) mysterious reasons for this ‘trick’, but the short of it goes as follows:

These macros are different from the ones above because they contain an assignment and possibly more than one. A pair of curly brackets would seem to solve the problem but  when used inside an if/else statement, a single semicolon (added after the macro) would cause havoc once the macro is expanded. The do/while wrapper solves the dilemma quite elegantly.

Most importantly, once the parser is satisfied, the loop is immediately optimised out by the compiler, with no residual performance penalty. In fact the XC8 compiler uses the full capabilities of the PIC instruction set and transforms those constructs into simple bit set (BSF) and bit clear (BCF) instructions!

Posted in PIC16, Tips and Tricks, Tools | Tagged , , | Comments Off on An MCC Mystery Solved

RADIX – PIC18F25K22 Rapid Prototyping

RADIX

If you are looking for a nice prototyping board featuring a PIC18F25K22 , I would take a look at the RADIX boards by Zardynamics.  For very little money you get a nice breakout of all device pins (coincidentally compatible mechanically and electrically with a very large number of “shields” -duino style), but also ready to plugin the standard MCHP tool chain (ICSP single in line connector for the PICKIT3). There is a serial to USB bridge of course. The only thing missing at this point would seem to be a mikroBUS connector, so to play with a few Click© boards!?   No need, there is a click-shield for that!

Posted in PIC18, Tools | Tagged , | Comments Off on RADIX – PIC18F25K22 Rapid Prototyping

Chrome Extensions and the Ultimate Platform

chrome-logo

The Chrome browser has never been my favourite for some mysterious (perhaps purely estetical) reason, but I have learned to appreciate it in recent time for the continuous (furious) effort the developer’s team has put into advancing its technology. Recent Chrome betas have been introducing a flurry of new APIs (application interfaces), to give Chrome Apps, simple Javascript programs,  (running as browser extensions) the ability to reach out beyond the confines of the browser screen and perhaps… crossing into the embedded space.

There are new APIs for the Serial Port, Bluetooth, USB, Video, … you name it. Yes, all these new capabilities could be pretty dangerous, but the developers have introduced a way for each application to declare which resources it would like to gain access to (listing them in a “manifest” file)[link] allowing the user to make the conscious / explicitly decision whether to take the risk (and gain functionality)  or deny access on a case by case basis.

There is a powerful (large) set of demo projects that can be downloaded from the Chrome web pages [link]. I definitely had to try and test at least the most basic one. I used the Serial port project to have my Mac dialog (via a USB to Serial bridge naturally) with a bare PIC16F1716 (just because it was laying on my desk) mounted on an otherwise mostly empty breadboard.

I followed the simple instructions to launch the Serial demo application locally on my Macbook browser [link] and …  it that worked  right out of the box( although there was no box involved!) , producing quite a bit of excitement.

SerialTest

I am quite the beginner in Javascript, but the code appeared to be relatively readable and clean.

var connection = new SerialConnection();

connection.onConnect.addListener(function() {
   log('connected to: ' + DEVICE_PATH);
   connection.send("Hello PIC16F1716");
});

As you can imagine my immediate next question was: “Can I run this on my iPad”?
You see where I am going here… a Chrome (browser extension) application could represent the ultimate example of platform independence. It would be the perfect solution for embedded tools and applications,  liberating them from the constraints/details of the desktop, the operating system, and Babel of incompatible cables and connectors.

Off I went to install the Chrome browser on my iPad Air and … nothing! Unfortunately, for all the effort being put into the desktop version of the browser, there is no corresponding effort on the mobile side to bring the same rich set of APIs. In fact there are no Chrome Extensions at all on any of the mobile platforms (Android included)!

This is something that has been known and lamented by many users and for a long time now, I am just among the last to join this party. So it might be that one of these days (hopefully not in a too distant future) we will get a pleasant surprise and the doors of connectivity will open for all our mobile web apps. Javascript will rule victorious over all other languages that day ( I am still not sure if I like the idea), and just a small BLE module will suffice to connect all our beloved micros, their tools and demo boards to our favourite screens du-jour.

Posted in Languages, PIC16, Tools | Tagged , , | Comments Off on Chrome Extensions and the Ultimate Platform

USB Swiss Army Knife

MCP2221 breakout board

MCP2221 Breakout Board

It’s the small things, the smallest boards, that often make my day!

This is the MCP2221 breakout board (ADM00559), and it is my new Swiss Army Knife. If you are not familiar already with the MCP product line, these are generally simple connectivity and analog products, including Operational Amplifiers, Comparators, DACs, ADC, digital potentiometers, I/O expanders… Over the last ten years Microchip built quite a large portfolio of them. The MCP2221 in particular is the last derivative of a sub-family dedicated to (USB) connectivity and it offers a  “USB to Serial” port bridge solution on steroids. The chip is small and really inexpensive, needs no crystal (uses the same Auto Clock Tuning feature found in the most recent generation of PIC16F1 devices) to provide Full Speed USB link and adds the ability to bridge to I2C as well (using a custom but simple HID interface). In fact the chip is too small for my general prototyping needs and that is where the breakout board comes to the rescue.

A mini-USB connector brings the power supply and data link. All signals are then conveniently presented in a dual in line (100mils spaced) 14-pin format ready to be used on a breadboard or pre-perforated prototyping area. Alternatively all the signals are brought to a single in line connector compatible with the PICKit Serial Analyser tool and therefore directly available for use with many existing demo boards (such as the PIC16F1 LV Evaluation Kit).

Power (from the USB port) can be selected via a Jumper to be 3 or 5V (small LDO is included for the 3V option). Two more jumpers provide optional pull-ups for the I2C lines (if used).  Additional pins can be used as GP I/Os under HID control.

In short, this breakout board is so nice that I have recently used it for everything … literally, often simply to power (!) other demo boards (LPC, Simplicity…) and of course for adding (printf) debugging capabilities to a number of little projects/experiments.

Highly recommended!

Posted in I2C, Tips and Tricks, Tools | Tagged , , | Comments Off on USB Swiss Army Knife

Compiler Construction (in Python)

CompilerConstruction

Learning <insert any subject here> has never been easier! Massive Open Online Courses are a real thing, and while we can debate how high we are at this point on the hype curve, the world is a better place because we do have access to a new powerful set of tools for learning. Even if less Massive and less Open, tools such as iTunesU can offer a lot of content from the best universities in the world. Being the happy user of a Mac (and an iPad) I did recently attend “virtually” a fast paced class taught by nothing less than prof. Paul Hegarty of Stanford School of Engineering:  ” Developing iOSX8 applications in Swift“.  The experience turned out to be so positive (high quality video and audio, great presenter, challenging but not impossible coding exercises), that shortly I was looking for more …

Now you might remember from my previous postings [1][2][3] that one of my all time favorite subjects at the university was: Programming Languages and their Compilers. This is likely because I had great teachers, as I had the luck to study with  prof. Hmeljak  and prof. Sipala at the University of Trieste. We followed the path traced by prof Niklaus Wirth, as I believe most European Universities do. We started with the Pascal language, continuing with Modula (II) and on to Oberon following a trajectory from a simple procedural (Algol-like) language to a more structured one, to a most modern object oriented. My first experience writing an actual compiler for such languages was  based on Wirth’s book “Algorithms + Data Structures”  where, in few chapters, the author manages to present a complete compiler for a subset of Pascal (called PL/0) written in the same language. Unfortunately since I was following an Electronic Engineering rather than a pure Computer Science program, my exposure to the subject remained limited to this one example. At the time I re-wrote the code in C (Borland Turbo-C that was) and attempted to modify the grammar to fit my own personal preferences as I am sure most CS students have done (or dreamed of).

Fast forward a few decades (oops), and here I am looking on iTunesU at the class: “Introduction to Compiler Construction”, presented by prof. Christoph Kirsch, of the University of Salzburg. He teaches using the “Wirth method” and develops an Oberon compiler (based on Oberon-0) as Wirth’s last work: Project Oberon – The Design of an Operating System and Compiler.  This was music to my ears!

Although Prof. Kirsch was suggesting to his students to use C/C++ to develop the compiler,  I could not help but feel the urge to spice things up a bit and follow the project with a small twist: I used Python to develop the simplified Oberon compiler!

Here is a [link] to the Github repository containing my new implementation of the simplified Oberon-0 compiler. I learned a lot (about Python and about compiler design) while doing the porting and I will report in a future post more about my experience and my plans for its future evolution… stay tuned!


Posted in Languages, Python, Tools | Tagged , , , , | Comments Off on Compiler Construction (in Python)