The Stack… so misunderstood

The stack is such a key element of every C program that too often we take it for granted and we don’t spend enough time to make sure we have it set properly. Most often we resolve to look into it only by the time we notice the code is mis-behaving and by trial and error, among many other things, we finally decide to make some more room for it and see if things improve… There has to be a better way to check and debug our stack allocation strategy.
To start with you need to understand how the linker allocates space for it (where and how much) and how we can control the process.

Considering only the PIC24F architecture (the dsPIC and PIC24H will add a few twists to what follows) the stack is defined by the linker as the largest (and last) block of RAM allocated after everything else has been taken care of…

In the simplest possible situation, starting from the lowest RAM addresses (right after the interrupt vectors tables) you will see the linker placing all your programs (global) variables and those required by the libraries you used. Then you will see the Heap (if any size>0 is defined) and last the stack, using up ALL the memory that remained available. A picture is worth a million words, here is what an example for a simple project using the PIC24FJ128GA010 would look like:

simple memory layout

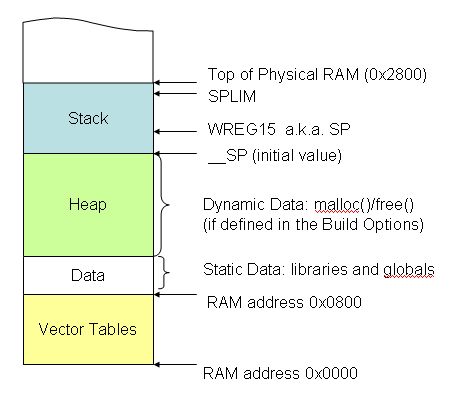
Since the stack of the PIC24 grows toward higher addresses as you use it, the stack pointer (WREG15) is initially set at the bottom of the stack area (__SP) by the C startup code. The stack limit register (SPLIM) is also set at this time to be an address just 8 bytes below the physical end of the memory space. The function of SPLIM is that of triggering a trap when our application reaches the upper limit and runs out of stack space.

The trap mechanism is very similar to an interrupt (of the highest possible priority) that calls a specific vector (_StackError) where we can place a handler routine. The MPLAB C30 compiler places a default handler (just a reset instruction) in each trap and each empty interrupt vector unless otherwise instructed. We can of course define a custom trap handler, but first let’s look at how we can control the amount of space reserved for the stack.

The project Build Options dialog box (select Project>Build Options>Project or click on the Build Options button Build Options button) is the obvious place where to look and in particular the MPLAB LINK30 pane:

LINK30 pane 
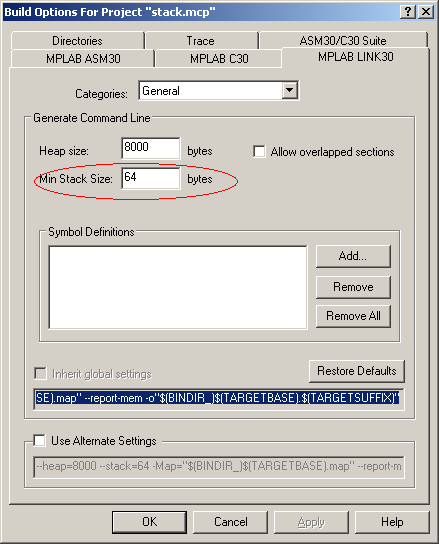
Here the Heap size and Min. Stack size parameters can be passed to the linker.

Notice that I marked in bold the word Min here, because it is way too easy to simply ignore this detail. In fact while we get full control on the size of the Heap, for the Stack we are given only the option to specify a “threshold” below which the linker will be required to “notify us”. The parameter we select here is NOT the value that will be used by the linker to set the initial stack pointer (__SP or WREG15) and/or to decide where the stack limit (SPLIM) is to be set! As we said above, the linker will first allocate all the other memory “objects” and then assign the largest remaining block of memory to the stack. So in other words, the true stack space size is defined sort of by default, as a result of the combination of all the other project parameters.

When all is said and done, the linker finally looks back and verifies that the size it came up with is larger than the Min Stack Size parameter we set. If it is not we get a compile time error right away. But if there is no error, the stack size could be actually much larger than the minimum amount we asked for.

Note that, probably because of my assembly programming background, this behavior is almost the opposite of the way I used to picture it to be. In my mind the stack size was the one deliberately assigned (just like I used to assign manually my stack pointer in the good old assembly days) and the Heap was supposed to be taking the left overs!

As a side effect of this allocation strategy, and mixing it with my (wrong) initial assumptions, I would like to illustrate a scenario that lead me in the past to considerable trouble and had me quite puzzled for a while.

In my application using both large global arrays and dynamic memory allocation (malloc()) I had the Min. Stack parameter set to 512 bytes and the Heap parameter set to 4,192. The application would run normally under these conditions, but the need for more dynamic memory and a few back of the envelope calculations induced me to think that I could really afford to allocate more space for the Heap (according to my estimates I was using only 1,512 bytes of RAM for my global variables) while keeping the stack safely to the present size. So I did increase the Heap size to 6k bytes, the linker did not complain about any issue with the stack, but the application started immediately behaving erratically producing inexplicable occasional resets.

What was going on?

To my surprise, after a lot of head scratching, I realized that my application was really using almost 1Kbytes of stack space. When the Heap was originally set to 4K bytes the Stack had been allocated as much as 2.5K bytes (8K-4K-1.5K=2.5K). A number larger than the minimum I was requesting.
When I increased the Heap size to 6K, the Stack got squeezed to 512 bytes (8K-6K-1.5K=.5K) still ok according to my request to the linker (notify me if less than 512…) but definitely not enough for the appetite of my application.

It is easy to fall in this trap (pun intended) and assume that since your Build Options are specifying X amount of bytes for the Stack, and your application is not crashing, your stack usage is X bytes or less. The actual amount of stack your application has been allocated and might be currently using could be much larger than the minimum specified. Finding out exactly how much could be quite tricky!

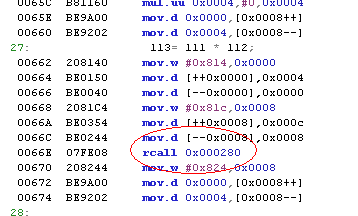
One quick reality check can be easily performed though, courtesy of the MPLAB C30 compiler (default options), you can inspect the build report in the output window Build pane: Build report

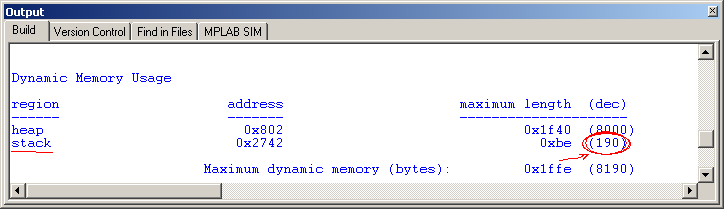
Circled in red is the actual stack size that, as you can see in the example, is lager (192) than the amount specified in the project build options (64, see previous picture).

But once more, don’t fall in a “new” trap, the reported “allocated” stack space is not telling us how much of it is actually used by the application!

(to be continued…)

Posted in Tips and Tricks | Comments Off on The Stack… so misunderstood

Watching Expressions

MPLAB has become such a large application, or I should better say “group” of applications, and it keeps evolving so fast that one can hardly keep up with the pace of monthly (when it is not weekly) updates. Typically before rushing to install a new version I scan quickly through the readme files to see if there is anything new that I could use immediately, otherwise I tend to postpone the update to let it … settle a bit, if you know what I mean.

With MPLAB 8.00 things were different. The PIC32 had just been announced and this was the first new version of MPLAB to openly support it. I was too curious to pass the opportunity and I did the install without paying much attention to what other features had been added.  Turns out, I made a mistake because I failed to notice a powerful update to the Watch window capabilities!

Now you can inspect/watch:

  • Aspecific element of an array: ar[12]
  • An object pointed to by a pointer: *ptr
  • An element of a structure/union: str.mbr
  • An element of a structure/union via a pointer: p->mbr
  • Perform simple math: vrbl-1
  • Use constants defined in the program in all of the above: ar[M_SIZE-1]

Just type these simple expressions directly in the watch window in the Symbol Name column

Watch Expressions

it will work seamlessly allowing you to get a better picture of your… bugs!

Posted in Tips and Tricks | Comments Off on Watching Expressions

File I/O with Static Allocation

I am sure you won’t be surprised to learn that most (if not all) of the code presented in the book is derived from my past experimentations on the PIC18 and PIC16 over a few years… In particular the FileIO project started on the PIC18F8720 and was, back then, associated to a different set of low level routines (for Compact Flash FLASH memory cards).

Also during debugging of the PIC24 version, I used static memory allocation (it made inspecting data structures with MPLAB so much easier), so when recently one of my readers asked about the possibility to modify the code to allow for static allocation of the I/O buffers and MEDIA data structures, it was easy for me to provide an “alternative”…

In fact this is nothing but a quick debugging fix, though it could be just your ticket. Below you will find two simple functions designed to replace malloc() and free() that can be inserted at the top of the fileio.c code (and enabled when the macro DBG is defined):

#ifdef DBG
//----------------------------------------------------------------------
// debugging malloc and free
#define F_MAX 2 // max number of files open
MFILE F[F_MAX];
MEDIA disk;
unsigned char B[F_MAX][512];
int Fcount=0, Bcount=0;

void * malloc( unsigned size)
{
if ( size == 512)
{
if ( Bcount<F_MAX)
return (void *)B[Bcount++];
else
return NULL;
}
else if ( size == sizeof( MFILE))
{
if ( Fcount<F_MAX)
return (void *)&F[Fcount++];
else
return NULL;
}
else if ( size == sizeof( MEDIA))
{
return &disk;
}
else
return NULL;
} // malloc

void free( void *p)
{
if (( p == B[0])||( p == B[1]))
Bcount--;
else
Fcount--;
} // free
#endif

NOTE: Should you try to port the code (back) to the C18 compiler, keep in mind that you will need to be very careful to modify the linker script as well to allow for the large buffers requiring more than 256 bytes each … Check the C18 compiler manual for help on how to allocate objects that are larger than 256bytes …

Posted in Tips and Tricks | Comments Off on File I/O with Static Allocation

The missing (pinout) table

There is one table I have been looking for many times among the PIC24 documentation and could never find… it’s a pin-out table, nothing fancy, but a complete one that would help me figure out quickly how to tell if and where a given I/O is used/shared/multiplexed with what…

Table 1.2 in the PIC24fj128GA010 datasheet  (DS39747C) for example list all the functions but it ends up also listing the same pin many times.  For example pin 44 (in the 100 pin package) is listed as AN15 and CN12 on page 11 and two pages later as RB15. This is very logical and convenient from an editorial point of view, as it allows for a single table to concisely include ALL the information (for all packages), but it makes it very hard for me, when looking for an available I/O to use, to discover if the pin is already in use or it could conflict with the operation of a given peripheral.

An option is to inspect the pin out diagrams (figures  from page 2 to page 4 of the datasheet)  but those are not as “complete”, and require quite some head turning (try and find OC5 in the 100pin diagram for example…)

In other words it would take a re-sorting of table 2.1 by pin#, times three, to provide one new table per package.

The solution I found to work best for my needs was to create an Excel spreadsheet that I could easily sort and re-sort on different columns.
So, here it is:  PIC24 Pinout (Missing) Table

The table can be re-sorted as needed by different package columns (64, 80 100-pin), by function or by peripheral (a little  familiarity with Excel might be required here: Select All, then Data>Sort> choose the column …)

As an added bonus it was easy to include the information about the pin usage by the Explore16 board and the various PICTail boards available (including the AV16 of course).

P.S. Should you find any error or omission, please make sure to report it to me…

Posted in Tips and Tricks | 1 Comment

Chapter 5 Excercises

The exercises assigned in Chapter 5 are actually quite advanced and are mostly meant to give you ideas of the kind of powerful things you can do in C using interrupts (and simple state machines). The following chapters, in particular in the third part of the book, will cover several such examples. The NTSC composite video generator (Exercise 5.3) is well described in Chapter 12, but you will be able to find the solution to the other two exercises in other (perhaps unexpected) places.

Excercise 5.2 is perhaps my favourite as you will find an example of (interrupt based) radio receiving routines (for a very special protocol) in the code attached to application note AN745, available for download as part of the vast collection of application notes available on Microchip’s web site.

Check the “rxi.c” module in particular. The code was written to be compatible with the HiTech C  compiler and the CCS compiler for the PIC16  architecture, but you should find it easy to port for the PIC24 and compile it with MPLAB C30.

The solution to Exercise 5.1 is not going to be very dissimilar…

Posted in PIC24, Tips and Tricks | Comments Off on Chapter 5 Excercises

More on Chapter 5 Tips and Tricks and builtin functions

If after yesterday’s posting you though things were getting ugly (I agree), you will be pleased to learn that since the introduction of MPLAB C30 v3.02 things have improved considerably. After all, performing the unlock sequences should not be an “impossible” task in C requiring super advanced inline assembly programming skills!

Four new builtin functions of the compiler come to our rescue:

  • __builtin_write_RTCWEN( void)
  • __builtin_write_NVM( void);
  • __builtin_write_OSCCONL( unsigned char value);
  • __builtin_write_OSCCONH( unsigned char value);

[Note: a double underscore preceeds each function name]
They give us complete access to the RCFGCAL, NVM and OSCCON control registers by performing the proper unlock sequences.

You will find a complete (long) list of builtin functions well documented in Appendix B of the MPLAB C30 compiler.

Posted in PIC24, Tips and Tricks | Comments Off on More on Chapter 5 Tips and Tricks and builtin functions

Chapter 5 Tips and Tricks

It is in Chapter 5 that we present for the first time the use of inline assembly. As a general rule in the book, this is a compromise accepted only in cases where we need to perform a task otherwise “impossible” if using only the C language, in this case: the unlock sequences of the OSCCON register and the RTCC register.

Both unlock sequences require the use of inline assembly because they must be performed in a very strict order, something we cannot “count” on the compiler to respect. Compilers are somewhat rebellious, they like to be in control of things and to be free to accomplish their tasks in the way THEY judge to be the most appropriate!

The inline assembly codes presented in the Tips and Tricks section works, but as I learned recently they are not optimal, especially when using the latest version of the MPLAB C30 compiler. A better way to do things is to still use inline assembly but, thanks to a special notation, let the compiler choose at least the registers to be used.

Here is an example showing the RTCC unlock sequence (and RTCWREN bit set) as recommended to me by the true MPLAB C30 gurus:

{int *nvmkey = &NVMKEY;
int v1 = 0x55;
asm volatile(“mov %0,[%1]\n\t”
“com %0,%0\n\t”
“mov %0,[%1]\n\t”
“bset RCFGCAL,#13” : “+r”(v1) : “r”(nvmkey));
}

First of all notice how two parameters (%0 and %1) are replacing what before was the explicit use of processor registers. Now the choice is left to the compiler so that there is no interference/limitation whatsoever with the compiler register optimization algorithms.

Notice how the four assembly statements are passed inside a single inline assembly statement using a special escape sequence to terminate each line (\n\t) and concatenate with the next one.

Finally notice how the statement contains two additional parameters separated by “:”. They inform the compiler of what kind of registers will be required and what kind of use we will make of them.

You will find more details on this special notation inside the MPLAB C30 compiler User Guide chapter 8. Some pretty advanced stuff!

Posted in PIC24, Tips and Tricks | Comments Off on Chapter 5 Tips and Tricks

Updating Chapter 5

A lot of work has been done in MPLAB C30 rev 3.02 to perfect the management of interrupts and it affects the examples presented in the book in a number of ways.

A) Let’s start with the simplest change, the processor interrupt level (represented by 3 bits in the status register) and defined as a bit-field in the “p24fj128ga010.h” include file, has changed name, it is now spelled “_IPL” rather than just “_IP”. I am not sure where, but they tell me it was causing a possible name conflict. The fix is quick and does not require further explanation.

B) More worrisome, but not as critical as you might think, is a new warning that is generated now for every new interrupt service routine defined in the code examples:
Interrupts.c: xx: warning:  PSV model not specified for ‘_xxInterrupt’;
This is due to some changes implemented in the compiler to facilitate the implementation of the CodeGuard(tm) technology. Nothing special, really, all that happens is that the compiler does NOT assume that the “PSV window” (unfortunately this is a feature we learn about only in the next Chapter 6)  is under his control. It actually assumes the opposite now (that our application is managing it ), and therefore it takes preventive actions to make sure it is not corrupted during the ISR execution (saving the PSV value on the stack before the ISR and restoring its value after it).  And it tells us about it:
assuming ‘auto_psv’ this may affect latency

as it warns us that this “precautionary” push and pop require a few extra instructions, that affect the overall interrupt latency.
The fact is that none of the examples in the book makes any attempt at modifying the PSV and the default value (assigned by the compiler) is used throughout.

Unfortunately there is no global switch (compiler option) that can change the compiler assumptions and we have to either accept the (redundant)  warning and the increased latency (just a couple of cycles) or remember to add an attribute to each and every interrupt routine we define:
__attribute__((no_auto_psv)) 

Did I ever mention before how I  don’t care for the quadruple underscore and double parenthesis required by all GNU compilers to extend the C syntax?

For example:

void _ISR  __attribute__((no_auto_psv))  _T1Interrupt( void)
{
A less distracting option would be to define a new macro:

#define _NOPSV  __attribute__((no_auto_psv))

and use it as in the following example:

void _ISR  _NOPSV  _T1Interrupt( void)
{
We could be tempted to modify directly the definition of the _ISR macro to include the additional no_auto_psv attribute. But the _ISR macro is defined inside the device “p24fj128ga010.h” include file, and it is not considered a safe practice to modify standard include files, actually that is a VERY bad idea…

For now, since this is the first chapter were we learn to declare and use interrupt service routines, I will propose we use the _NOPSV macro explicitly.

Here are the source codes used alternatively in the interrupt.mcp project:

1- Interrupts.c

2- Interrupts 32kHz

Posted in PIC24, Tips and Tricks | Comments Off on Updating Chapter 5

Flying along the Salt River

Probably most of you will think of Arizona as one flat desert place, but that is quite a mistake. Actually 70% or Arizona surface is covered by mountainous terrain. It is true though that 90% of the population do live in the arid and flat part of the state and a large portion of that population is specifically concentrated in the Phoenix metropolitan area.

From Chandler, one of the suburbs south of Phoenix where I keep my airplane hangared, it takes less than 10 min. of flying time to get to 8,000 ft peaks, canyons and lakes of breathtaking beauty.

This Sunday I had a special mission. Dick, my neighbor, was planning one of his fishing expeditions along the Salt River. He typically adventures in such remote areas with his jeep relying on his GPS and the available topo maps, but this time he had asked me to help him prospect the area by the air before adventuring further in where his maps were showing no access.

The air was extremely smooth on a freezing, but sunny, morning like only Arizona can offer in January. We transitioned over Falcon Field and then climbed to 6,000 feet to reach lake Roosvelt and proceed on to follow the Salt River.

six pack

My mistake was not to bring the digital camera with me this time so, I apologize in advance, you will have to rely only on the few low-res pictures we took with my cell phone camera…

Salt River Crossing

After approx. 30min. we passed the gorge, where the only bridge that crosses the river takes the highway 60 north toward Showlow, and we continued East along the steeper part of the river canyons.

There was still snow on the canyon walls covered partially by forest and exposed to the North.

snow

We followed several faint tracks and marked the points on the plane’s GPS where we believed they could be usable to reach the river.

white river

Flying slowly and following the river twists and turns, after about an hour, we reached the point where the Black river and White river merge. A few miles further up, we landed at WhiteRiver(E24), deep inside the Apache Indian reservation, for a little rest.

For our return, we picked a lazy and panoramic route west, passing over the huge mines of Miami (AZ)
Miami

overflying Superior and then reaching Chandler back from the south east, just skimming the San Tan mountains and the busy Williams airport airspace.

2.8 hours of cross country flying in smooth clear air, pure bliss!

Posted in Flying | Tagged | 2 Comments

Updating Chapter 4

There are no changes required to the code in chapter 4 after the upgrade to MPLAB C30 v.3.02. But there are some changes in MPLAB 8.00 behavior that will have you puzzled when looking for the subroutines (library modules) used by the compiler for the long long (64-bit) integer multiplications.

In fact, the listing in the Disassembly window will not show anymore the long long multiplication routine muldi3.c as MPLAB 7.40 and older versions did. In a way the Disassembly listing has been cleaned up a bit, but don’t despair. If you follow the next few steps you’ll be able to find the missing routine anyway:

  1. Take note of the subroutine address, the number after the rcall mnemonic:
    (00280 in my case)
    long long mul
  2. Open the Program Memory Window and make sure to select the Symbolic view
    (use the tabs at the bottom left corner of the window)
  3. Press CTRL+F to open the search dialog box and type the address (00280) or simply scroll down the window until you reach the address.
    00280
  4. There you will recognize the label __muldi3 marking the entry point of the 64-bit multiplication routine used by the compiler. (That’s pretty dry reading, isn’t it?)

Looking at the exercises proposed in Chapter 4:

  1. Using Timer2 to self time the number of cycles used by each arithmetic operation is just a good idea. Exercise 4-1
    Most/all operations will fall withing the 16-bit resolution of the timer (within 65,536 cycles) so that it is easy to obtain all the cycle counts in a single watch window shot:
    multiplications
    Notice how some of the values changed a little bit since version 1.30 of the MPLAB C30 compiler?
  2. Checking all the divisions at once is just as simple now: Excercise 4-2
    Here are the results:
    divisions
    Do you notice anything interesting? Who said float math has to be always slower than integer?
  3. Trigonometric operations (sin()) is performed using polynomial approximations and therefore multiple additions and multiplications. This has to be “hard”… Excercise 4-3
    trig
    Looking at these numbers you can almost guess the order of the polynomials…
  4. Complex math as well is composed of multiple operations of the fundamental type (integer/float): Excercise 4-4
    complex
Posted in PIC24, Tips and Tricks | Comments Off on Updating Chapter 4