Updating Chapter 3

Chapter 3 does not require any special consideration after the upgrade to MPLAB C30 v.3.02. So we will take the opportunity to work on the examples proposed:

  1. Sensing a button before starting the sequence is a step in the right direction to help the visual synchronization as long as the operator has good motion coordination skills. Here is the simple enough code that assumes the leftmost button on the Explorer 16 demonstration board (connected to PORTD pin 6 -RD6) is used: Exercise 3-1
  2. Things can be improved further if a little electro-mechanical ingenuity is used. Adding a pendulum and a second contact to detect the beginning of the hand sweep and the counter hand sweep to produce a reversed sequence (a good opportunity to show a for loop counting down). The following code will assume that the second switch is connected in parallel to the rightmost button on the Explorer16 (PORTD pin 13 -RD13): Exercise 3-2

As I am writing this, I feel the urge to explore other more sophisticated options. For example, how about checking the two switches for a few sweeps timing the hand motion and later starting the display after scaling/optimizing the delay intervals  to obtain a single message in both directions and possibly perfectly “centered”?  The algorithm could also constantly adjust the timing at each subsequent hand movement… oh how sweet!?

Posted in PIC24, Tips and Tricks | Comments Off on Updating Chapter 3

Updating Chapter 2

Continuing with the review of the code examples for the latest revision of the MPLAB C30 compiler (3.02) it is time to look at Chapter 2.

There is a single example used in this chapter and the code needs no massaging beside remembering to disable the advanced warnings or otherwise ignore the obvious complaint about main() type (see previous post).

Here is the code: Loop.c

Notice that the definition of DELAY can be shortened to just 16 to speed up considerably (1000 x) the simulation when using only MPLAB SIM and the Logic Analyzer window.

We can also take the opportunity to complete the exercises proposed at the end of the chapter:

  1. The first exercise required us to replace the simple on/off sequence with a count.
    Declaring an 8-bit integer called count (this might require some of you to peek into chapter 4 already) we get the mission accomplished quickly: Exercise 2-1.
  2. The second exercise required us to replace the on/off sequence with a rotating pattern. To make things more interesting we will choose a 16-bit variable that we will call pattern. The exercise is actually quite valuable because it forces us to recognize the fact that in C language there is no concept of rotation, but there are only shift operators. So unless we make use of inline assembly, we are forced to take things in our hands and perform a three steps sequence: Exercise 2-2. Commenting and un-commenting different sections you will see examples of right and left rotations.
    Adding all PORTA pins to the channels of the Logic Analizer will help get the full picture:
    shift right

The C programming experts among you will not fail to recognize the opportunity to use special “shortcuts” using advanced operators such as +=, >>=, <<= and some conditional expressions trickery.

Posted in PIC24, Tips and Tricks | Comments Off on Updating Chapter 2

About main() and Advanced Warnings

The main() function is … a function and as such it is expected to either have a return value of a declared type (int, char …) or no return value at all in which case it should be declared using the keyword void. But from all the examples in the book you will notice that I do not use either of the two options. This is because, as part of my personal programming style, I like to use a “shortcut” that is part of the C language since the beginning of times (K&R). In fact, by default, declaring the main() function without specifying a type, I am telling the C compiler to assume it will be int.

Further, since we are not using an operating system, it does not matter if the main() function ever returns any value and therefore, in all the examples, you will notice that there is no return statement at the end of main() (by the way, we never return at all, as we typically stay in the main loop forever…

This is all nice and dandy, and can go completely unnoticed, until you enable the “advanced warnings” in the project configuration dialog box (Projects>Build Options for project”).

Project Build Options Dialog box

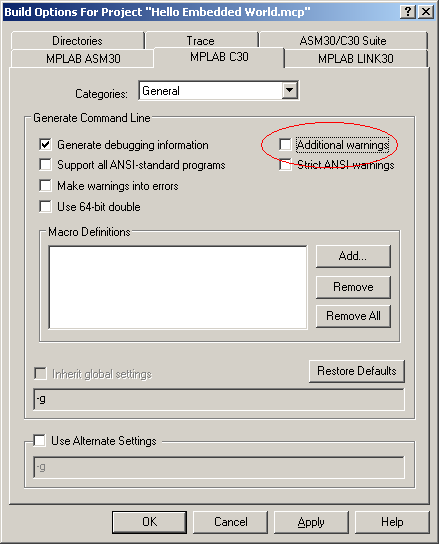
Enabling the Advanced Warnings is, in principle, a very good idea (and is now a default setting when you create a new project with MPLAB) since you can potentially expose a larger number of errors in your code, but it also creates a large number of “false alarms” as most of the “default” behaviors of the C compiler are now seen with a more critical eye…

So, if the advanced warnings are enabled, you will get a couple of extra error warnings:

  1. The compiler will demand that you give main() a type
  2. Depending if you choose to comply and declare main as
    a) int main( void)
    { …
    }
    or
    b) void main( void)
    { …
    }
    you are bound to get more warnings

If you chose option a), you will be asked to provide at least one return statement within the main function…

If you chose option b), you will receive another warning reminding you that main() was truly meant to return an integer …

In other words, you cannot win, because even if you chose a) and then add a useless return statement at the end of the main() function, you will be reminded later that the code is “unreachable” … which is profoundly true, since the application will typically remain in the main loop … forever.

My recommendation?

  1. Decide what is going to work best for your programming style.
  2. Tolerate the warnings, they are just that: warnings! They are not going to prevent your program from running correctly and they do not mean that there is necessarily anything wrong with your code,
  3. (and/or) Disable the advanced warnings immediately or just once you have convinced yourself that there is nothing ELSE wrong with your code.

The experts among you will learn/know how to disable individual warnings and will bypass all of the above…

Posted in PIC24, Tips and Tricks | 1 Comment

Setting the configuration bits

Speaking of configuration bits, in the book I have made clear from the beginning that I would expect the reader to set them always in a specific configuration chosen for debugging with the Explorer16 board. In fact the checklists titled “Device Configuration for Explorer16 demonstration board” guides the reader through a few steps accessing the “Configure” menu and opening the Configuration Bits dialog box. This dialog box in particular has been enhanced in the latest versions of MPLAB to include one new checkbox at the top titled: “Configuration Bits set in Code“. In order to select the configuration manually, as suggested in the book, this checkbox must be unchecked!

On the other side, with the checkbox checked, we can take advantage of this new feature and make our configuration part of the source code. Before we delve into the details of the syntax to be used, we must consider the pros and cons that come with it, let’s start with the pros:

  1. Documentation: when publishing the code, the configuration is automatically included
  2. Permanent association: code and configuration are now permanently joined

On the other side the cons include:

  1. Device dependence: the configuration is strictly related to the device chosen
  2. Cryptic: the syntax as we well see shortly is far from readable or self explanatory
  3. Repetitive: we would need to include the same lines of code at the top of each project in the book or hide them in an include file ad hoc (hence voiding the number 1 pro: documentation)

My preference would be for the first chapters to maintain the use of the manual configuration, which is persistent in MPLAB as we create new projects and more readable. I ‘d suggest a transition to the configuration in code for the later chapters and the more advanced projects.

PIC24 Device Configuration in Code

The MPLAB C30 compiler does not offer any special extension to take care of the device configuration bits, but rather leaves the job to the linker. After all, it is a matter of setting a few bits (initializing) a couple of special locations in FLASH memory, a task easily accomplished by a few pre-processor macros (and the linker).

You will find them inside the device include file “p24fj128ga010.h” almost at the very end of the long long file, including examples of their use and some useful hints on where to place them:

/*
** Only one invocation of CONFIG1 should appear in a project,
** at the top of a C source file (outside of any function).
**
** The following constants can be used to set CONFIG1.
** Multiple options may be combined, as shown:
**
** _CONFIG1( OPT1_ON & OPT2_OFF & OPT3_PLL )

*/

To match the device configuration proposed in the book’s checklists, place the following two lines of code at the top of the main source code of each project (but after the #include <p24…> statement):

_CONFIG1( JTAGEN_OFF & GCP_OFF & GWRP_OFF & ICS_PGx2 & FWDTEN_OFF)

_CONFIG2( FNOSC_PRIPLL & FCKSM_CSDCMD & OSCIOFNC_OFF & POSCMOD_HS)

Now you understand what I meant above when I mentioned the code to be a bit cryptic…

Posted in PIC24, Tips and Tricks | 2 Comments

MPLAB C30 v 3.02

Part of the challenge of writing a book based on new tools and products is to make sure that the content remains valid and relevant as they tend to evolve quickly in the months and years after the book release. In our case, both the PIC24 product line and most of the tools surrounding it have changed considerably since the book release in March. This is without even considering the fact that most of the actual book content was written on average another 12 months before publication. Think of all the new PIC24 models introduced in 2007 (40+), the new peripherals introduced (think of the Peripheral Pin Select) and the changes in the MPLAB IDE , the MPLAB SIM simulator stimulus interface etc… The recent release of version 3.02 of the MPLAB C30 compiler represents a tipping point for the projects in the book…

We need to go back chapter by chapter and re-check all the projects to provide the new readers a better cleaner experience. In fact we can do this together…

Let’s start. Here are my notes for Chapter 1: The First Flight

1- I had to re-build the workspace. The latest version of MPLAB uses a different window manager. The docking mechanism has changed in particular… so close all the windows (Including the Project and the Output window) and then re-open them again. Reposition the windows as you prefer.

2- Some readers have asked for separate files to be offered for each phase of experimentation in the project. So I have now saved 4 separate files:

  1. Hello1. ccontains the very first experiment with PORTA.
  2. Hello2.c contains the fix to make PORTA output pins work.
  3. Hello3.c contains the test of PORTB.
  4. Hello4.c contains the fix required to re-gain control of the analog pins on PORTB.

NOTE: A common problem reported by many readers (who did not use the checklists) is the lack of control of 4 pins of PORTA. They are in particular pin RA0, RA1, RA4 and RA5 and they seem to misbehave no matter what they do to the TRISA and PORTA registers. It is the JTAG port that takes control of those pins when enabled. Since we don’t use it, at least none of the Microchip development tools does, disable it setting the appropriate configuration bit.


Posted in PIC24, Tips and Tricks | Comments Off on MPLAB C30 v 3.02

AV16 Board

So this is what the AV16 board looks like (I just realized I did not have pictures of the completed board on the web site):

AV16 board

In this picture you see it mounted on the Explorer16 first slot. The audio jack on the right side is connected to my computer set of amplified loudspeakers (with a nice sub-woofer for extra humph) and the video jack on the left is connected to a TV.

To check the availability of the AV16 board and/or to order one, refer to the AV16 page on the FlyingPIC24.com web site.

subwoofer AV16

In reality I use one of those cheap portable LCD DVD players ($99 last Christmas at Fry’s) as my output device during development and debugging.

DVD KBD AV16

If you look carefully at the bottom of the board you will notice that I have made some modifications to the video circuit (added one resistor and a “blue” wire) while experimenting with … new features … in particular I was trying to simplify further the graphic.c routines having the OC3 peripheral produce directly the SYNC signal. More on this soon…

If you really have good eyes though, you will notice that I was not using exactly a PIC24 when this picture was taken…

Posted in AV16/32, PIC24, PIC32 | Tagged | 1 Comment